🔧 Tools
We have several tools you can use that makes practicing the game a lot easier. Let's start with the dev menu.
Keep in mind that only PC has access to these tools, there's no way to use any of these on consoles.
Dev Menu
To access the dev menu, you're gonna need to launch It Takes Two with the -devmenu command line argument.
There are multiple ways to do this, depending on where you bought your game.
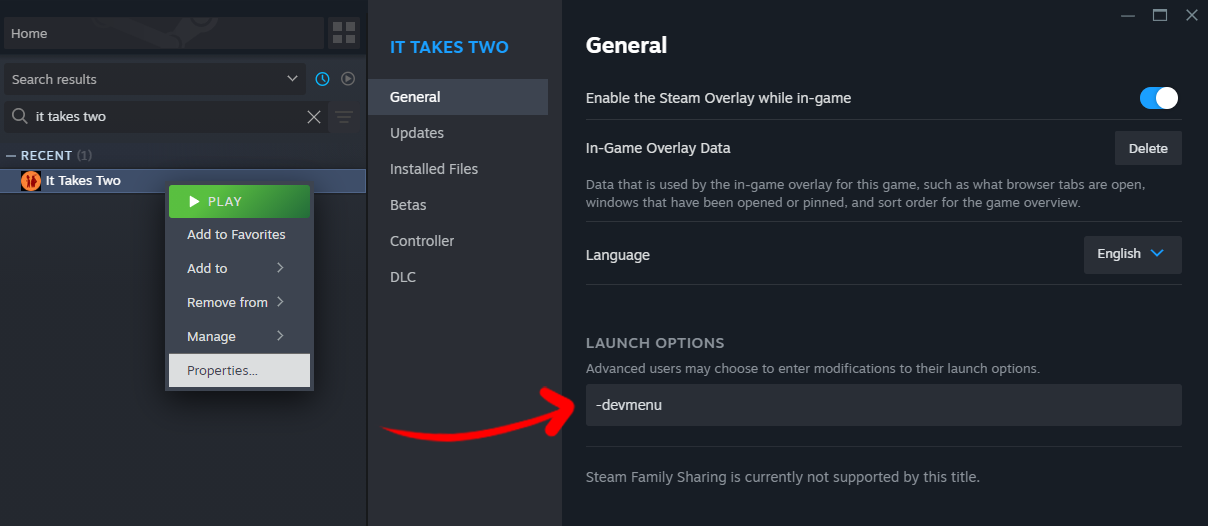
Steam
Right click It Takes Two and select Properties...
Under the GENERAL tab, add -devmenu into the launch options.
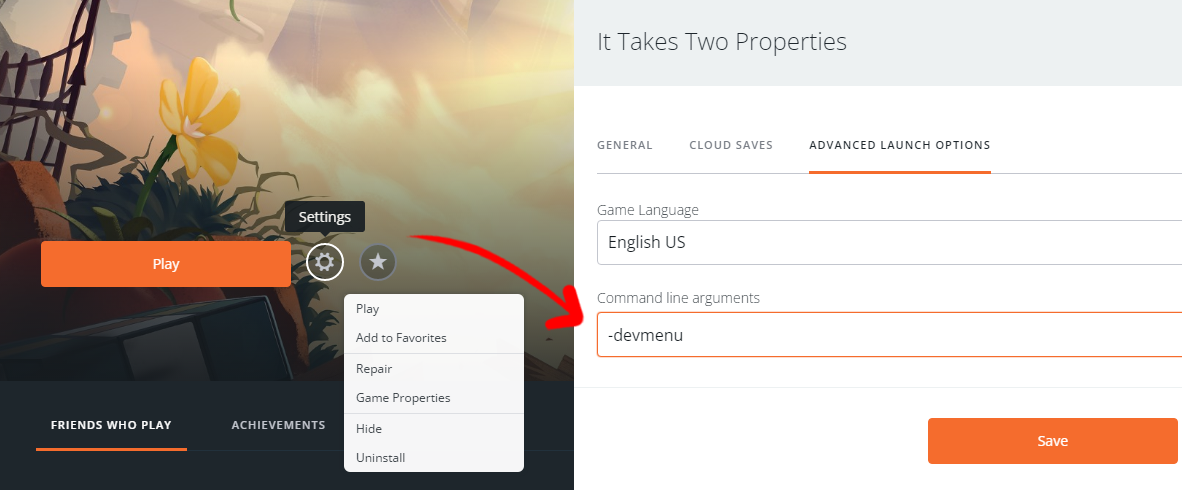
Origin
Find It Takes Two and click the settings cogwheel next to "play", then select Game Properties
Under the ADVANCED LAUNCH OPTIONS tab, add -devmenu into the command line arguments.
EA Launcher
Right click It Takes Two and select View properties
Add -devmenu into the advanced launch options.
Get EA Launcher screenshots for this!!
Other
THIS NEEDS CONFIRMATION
If you have the game through the Xbox Game Pass, there doesn't seem to be anywhere you can set a command line argument. However, we can try doing it the good old fashioned way.
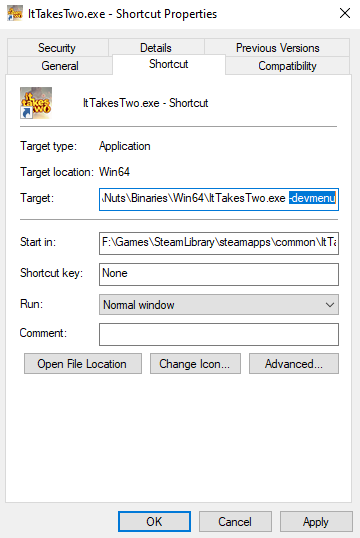
- Find your It Takes Two installation directory
- Navigate to
ItTakesTwo\Nuts\Binaries\Win64 - Right click
ItTakesTwo.exeand clickCreate shortcut - Right click the shortcut that was just created, and click
Properties - At the end of the
Target:box, add-devmenu
And you should be good to launch the game!
How to open the dev menu
Now that you have enabled the dev menu, go ahead and enter the game.
In your pause menu, you should now have an extra button that says "(DEV) Open Developer Menu". That should open up the Levels tab of the dev menu, and this lets you teleport to any checkpoint in the game! Pretty neat right?
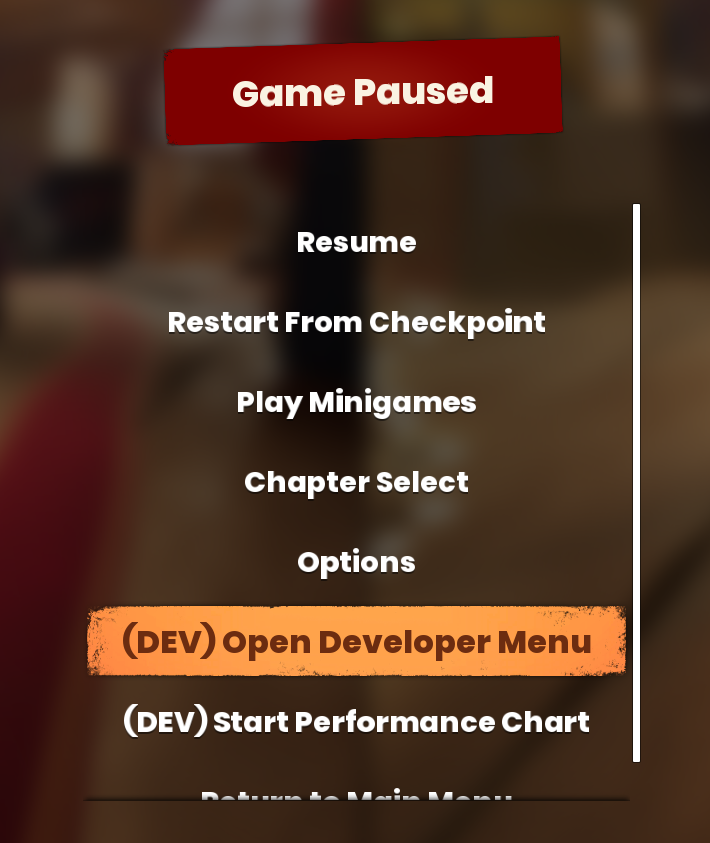
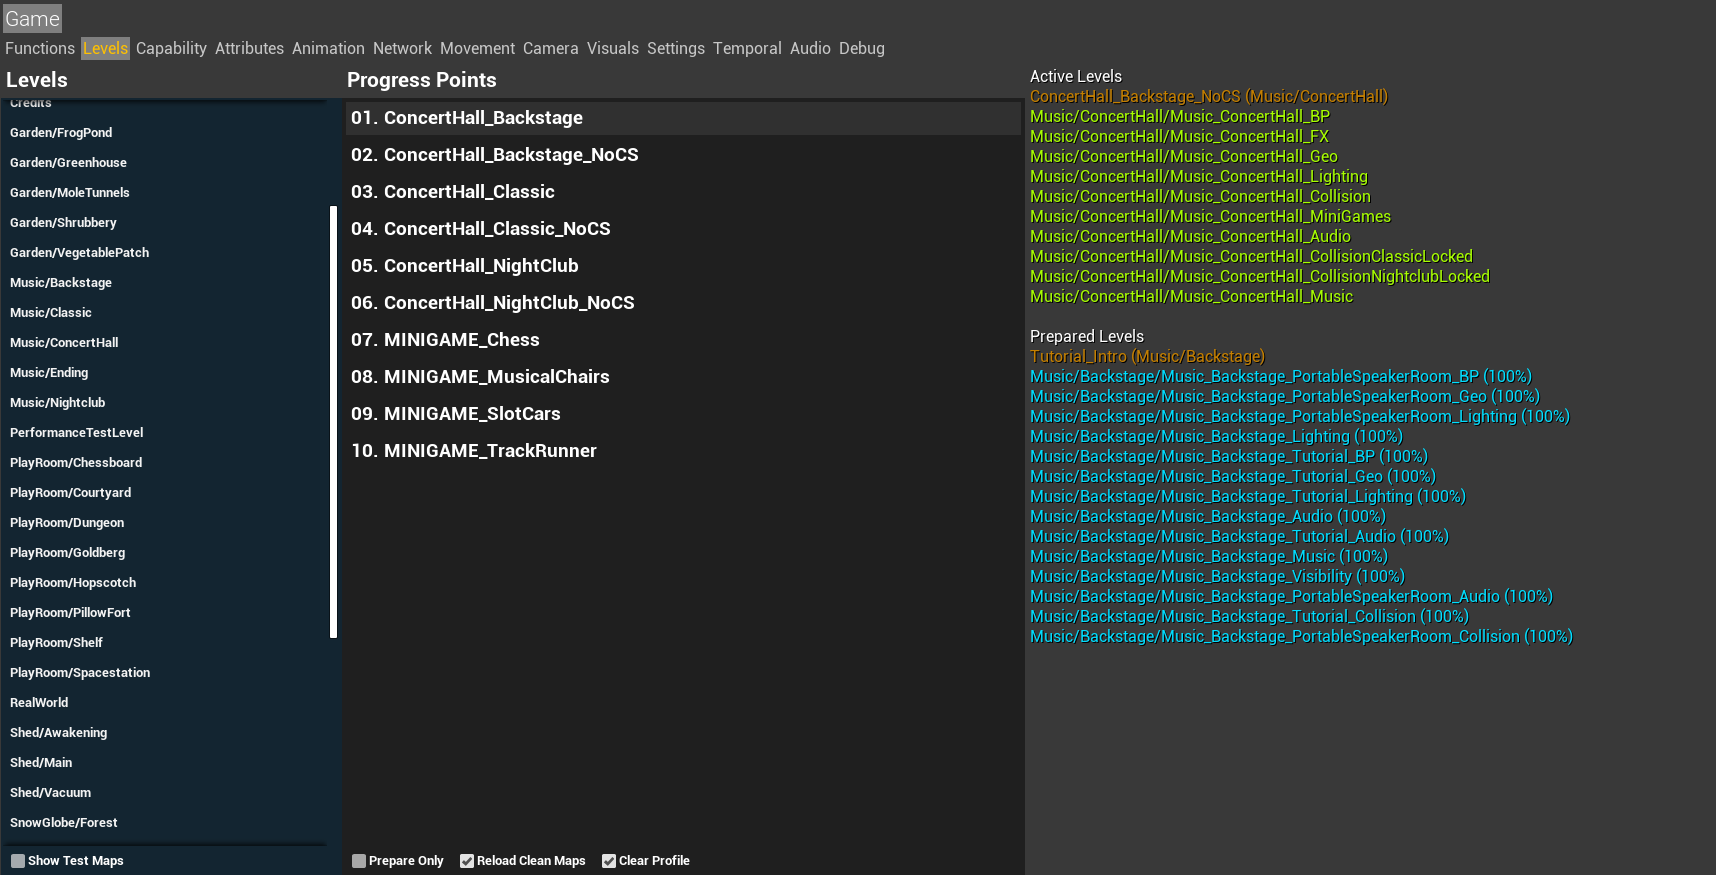
The dev menu does have some other information and things that can be helpful when routing, but I'll go into more detail about the dev menu here. By default the dev menu is only available in the pause menu, but there is a way to enable it in the main menu, which brings us over to...
Speedtools
What are speedtools? Speedtools is an angelscript mod that lets you:
- Save your positon
- Teleport to your saved position
- Teleport to your partner
- Save and load a checkpoint
- Show volumes
- Use the dev menu in the main menu
There are two ways to install speedtools. Let's start with the easiest one:
Automatic
This uses the Angelscript Mod Installer to install speedtools. Glint has a video that covers how to install and what you can do with speedtools here:
INSERT INFO ABOUT AUTOMATIC INSTALLATION HERE
Manual
Installation
Here's how to manually install the latest version of speedtools yourself. First things first, you're going to want the latest version of speedtools, which you can find here.
Navigate to your It Takes Two installation folder. In steam for example, you can find this folder by right clicking It Takes Two, select Manage then Browse Local Files. Once you have found your installation folder, find the ItTakesTwo\Nuts\Script folder.
Open the Speedtools.zip file you downloaded earlier, and inside it you will find 3 folders: Rice, Speed and Vino. Drag these into the Script folder you just opened up, and click "Replace the files in the destination" when that prompt shows up.
Next, if you have a file called PrecompiledScript.Cache in your Script folder, either delete it or create a new folder called PrecompiledScript and move it in there. Moving or deleting this file forces the game to compile the entire script folder when the game starts, letting you use speedtools.
Settings
If you want to change the speedtools settings, open the Speed folder and open SpeedSettings.as in a text editor. Inside this file you should see the following lines of code:
const bool SpeedToolsActiveOnLaunch = false;

const FName SaveState1 = ActionNames::SwingAttach;
const FName SaveState2 = ActionNames::FindOtherPlayer;
const FName LoadState1 = ActionNames::MovementSprintToggle;
const FName LoadState2 = ActionNames::SwingAttach;
const FName TeleportOther1 = ActionNames::Cancel;
const FName TeleportOther2 = ActionNames::FindOtherPlayer;
Change SpeedToolsActiveOnLaunch to true if you want speedtools to be active when you launch the game. If it's set to false, you will have to enable it in the dev menu functions.
The other settings indicate the first and second input you're going to need to do to do these actions. Here's a list of ActionNames you can choose from, as well as their default actual keybinds:
"ActionNames::MovementSprintToggle"         Default keybind: Caps Lock
"ActionNames::MovementJump"                 Default keybind: Space
"ActionNames::MovementDash"                 Default keybind: Left Shift
"ActionNames::MovementCrouch"               Default keybind: Ctrl
"ActionNames::InteractionTrigger"           Default keybind: E
"ActionNames::SwingAttach"                  Default keybind: F
"ActionNames::WeaponFire"                   Default keybind: Left Mouse Button
"ActionNames::WeaponAim"                    Default keybind: Right Mouse Button
"ActionNames::FindOtherPlayer"              Default keybind: Middle Mouse Button
"ActionNames::Cancel"                       Default keybind: Q
"ActionNames::GUIOk"                        Default keybind: Enter
"ActionNames::MusicFlyingTightTurnRight"    Default keybind: C
Down the line I will probably change the settings file to be more user friendly for manual editing. I would highly suggest using the Mod Manager to easily set your keybinds for speedtools. As of right now there's no way to add manual keybinds (e.g. F1 or H), and we have to use the predefined ActionNames.
How to view volumes
To let you view volumes (things like checkpoint triggers, death planes, invisible walls etc), you're going to need to edit the Engine.ini file. To find the Engine.ini file, paste this into the address bar of windows explorer: %localappdata%\ItTakesTwo\Saved\Config\WindowsNoEditor
Then open the Engine.ini file here in a text editor, and add the following:
[/script/engine.renderersettings]
r.ForceDebugViewModes=1
I usually add this to the top of the file, but it doesn't really matter where you add it, as long as you keep an empty line between this and the next and previous section. The file should look something like this:
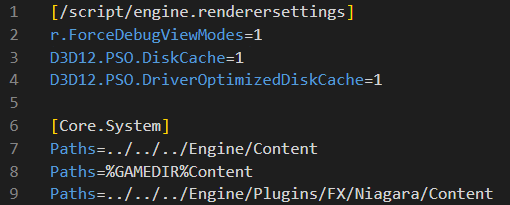
The extra D3D12 lines you see in the screenshot is added to improve FPS rates and consistency. For more information about DX12 and ITT, go here. TODO: INSERT LINK
How to use speedtools
To enable or disable speedtools while in game, head over to the functions tab of the dev menu and press the "Speedtools" button.
Save states
For the rest of this guide I'm going to assume you're using the default speedtool settings and in-game keybindings.
- To save your position, press F, then MMB.
- To teleport to your saved position, press Caps Lock, then F.
- To teleport to your partner, press Q, then MMB.
This also works with vehicles, for example the frogs in Frog Pond and the plane in Getaway.
Volumes
You can bind the ability to toggle volumes on or off to a key. To do this, open the dev menu, and head to the functions tab. Hover over the "Show_Volumes" function on either May or Cody, hold Ctrl and then any button you want to bind it to. To show volumes, either click the "Show_Volumes" button in the dev menu, or use your keybind.
If you can't see any volumes, refer to the How to view volumes section above.
There are a lot of different volumes, and you can distinguish most of them by their colour:
- Pink outlines can mean a couple of different things, as it seems to be the default colour.
- Player based triggers
- Checkpoints
- Collision
- Minigames
- Blue outlines are physics objects.
- Green outlines are for camera control.
- Red outlines are death planes.
- Teal outlines are spawn boxes.
Checkpoint save and load
Similar to volumes, you can assign these to keys in the functions tab of the dev menu. Pressing "Save_Checkpoint" will store your current checkpoint. Pressing "Load_Checkpoint" will load the stored checkpoint.
This feature is pretty self explanatory, but it's extremely useful for practicing things such as Pocket Watch room, or 100% where you collect multiple checkpoints in a row.
Misc
You can swap the control input of either character by clicking the "SwapControllers" button in the functions tab of the dev menu. Note that this only works in local.